Update March, 6, 2017: If you ever need to renew the cert you install using the tips below, see update at the bottom of this post for important information about certificates, Windows Server 2012 R2 and SQL Server Reporting Services.
One thing you know you should never, ever do is expose a database server to the internet, right? It’s scary what will happen to that machine. You’re sure it’ll be pwned in seconds. So, you resist until the client demands you do it.
“OK, ok…” you say, exhaustedly deferring to the client, “If we must expose a DBMS to the internet, let’s add some protection by moving it from its default listening ports and by forcing encryption between clients and the DBMS.”
This post details about a few things I learned while doing just that with Microsoft SQL Server in an AWS EC2 instance. The objective was simple: create a SQL Server “data mart” fed production data via SQL Server replication from DBMS instances in private VPC subnets. The replicated data, exposed on the internet, is used for creating reports via SQL Server Reporting Services (SSRS). All of what I talk about here is, of course, documented and Google-able. But I hope by collecting some pointers in one place with a few representative screenshots, it’ll help you get to success faster and save you a little of the head-scratching I experienced.
One of the first things you do when you have a child is name her. Thinking about names — in this case DNS names — is the first thing you should do when setting up any EC2 instance. Create a naming convention — and stick with it.
I’m a fan of Route 53 private DNS which, while imperfect, allows you to have both an “internal” name for an EC2 instance and a public DNS name on different IP addresses. My convention is that a Route 53 private hosted zone resolves requests in the .aws domain to the instance’s private address in the subnet and the same instance’s Route 53 .com entry resolves to the Elastic IP (EIP) address of the instance in a public VPC subnet. As you can see in the screen shot below from Route 53, I have two zones — one private and the other public — that are referring to the same instance with an internal address and an external address. I won’t go into the VPC routing and/or firewall implications here except to say that you have to set up VPC route tables to permit traffic between the public and private subnets and you must also permit inbound traffic in the Windows firewall in the EC2 instance.
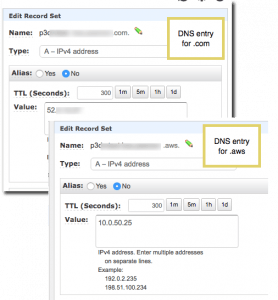
(Images in this post are taken from a client’s AWS account so I’ve obscured identifying information. You should be able to figure out what’s going on from what’s not been blurred.)
The most important takeaway about DNS for SQL Server in EC2 is that since you want to encrypt all communications between the EC2 instance and clients on the internet, you are going to have to install a cert directly into SQL Server. And since clients will include browsers using a variety of connections to the DBMS, a self-signed cert is off the table. A self-signed cert is just too much work and too error-prone.
That means you need a high-quality cert from a CA whose root certificates are already configured into common browsers (Firefox) and OSs (Windows, macOS for Chrome, Edge, IE and Safari). Save yourself a ton of work — just go get a cert from DigiCert. These guys are expert, helpful and responsive. And their certificates are competitively priced.
Selecting names and deciding where to get a certificate are just the beginning of what I found to be a very complex certificate installation process. The documentation is accurate but unhelpful without screenshots or examples. There are some nuances not discussed in the documentation that will help you set up you cert correctly in SQL Server. Here are some tips:
- Forget about — and I mean don’t even think about — using a wildcard cert for SQL Server. That is, unless you have a DigitCert wildcard cert. DigiCert wildcard certs come with unlimited reissues — and you can reissue your wildcard for a specific FQDN (fully qualified domain name) for free. You have to ask DigiCert to do it for you, however. You need a high-quality cert with the correct FQDN because…
- The cert must match the FQDN of the SQL Server instance exactly. That is, the FQDN must be in the “Subject” field of the cert. If you try to install a cert with the FQDN in the “SAN” (Subject Alternative Name) field of the cert, you will fail. SQL Server will never recognize it. Full stop.
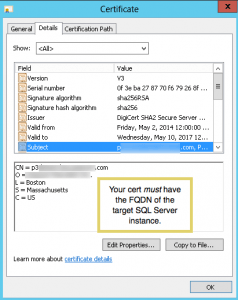
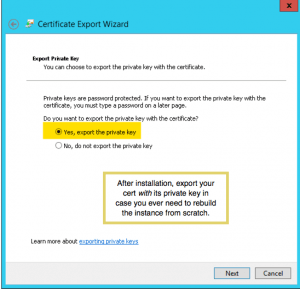
Cert for SQL Server must match FQDN in subject field (click to enlarge) - Make certain that you create a certificate signing request (CSR) on the target EC2 instance. That’s because Windows does its best to make the private key inaccessible (just try looking for it in the registry or the file system!). DigiCert makes this easy with a utility you can download and run on Windows. Once you obtain your cert and install it in the machine store, you can export the installed cert as a .pfx file with the private key. The .pfx file can be used on a replacement EC2 instance, should you need to do so. Here’s a screen shot showing where to select exporting the private key in the cert export wizard:
- Here’s a really obscure requirement: you must give the SQL Server process (
MSSQLSERVER) permission to access the cert’s private key. I’ve never needed to do this for any other app, IIS included. But the requirement is documented and if you fail to grant access, SQL Server won’t be able to use the cert. This setting is buried in the Windows Server UI and I couldn’t find an easy way to do this in PowerShell. Here’s where to change the permissions on the cert’s private key: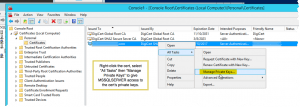
Manage permissions for private keys in Windows certificates (click to enlarge) And here’s the service to grant permission to:
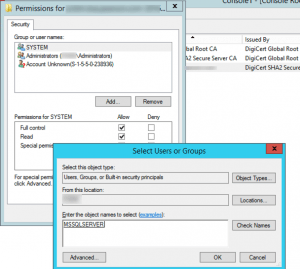
Grant SQL Server permission to access a private key (click to enlarge) Update 2021-11-20: Because I always forget this and because the screen shot above simply shows the result of validating the name, you should be sure to enter the name of
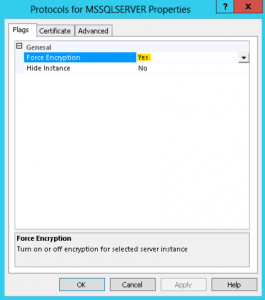
MSSQLSERVERasNT Service\MSSQLSERVERand then hit Ctrl-K to validate the object name. - Finally, after all this work, turn on force encryption in SQL Server Configuration Manager so that all connections are secure:
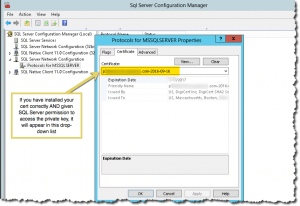
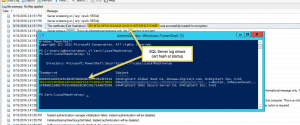
So, with all these certificate caveats and gotchas, what does success look like? Two things. First, you’ll be able to select your cert in the SQL Server Configuration Manager drop-down on the certificates tab. Second, if you take a look at the SQL Server startup log, you’ll see that the cert’s hash (thumbprint) matches the cert in the computer’s certificate store:
By comparison, moving SQL Server off of its default TCP listening port of 1433 is relatively easy.
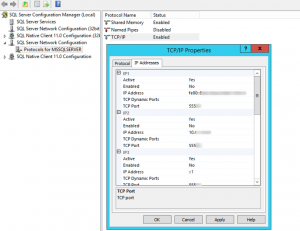
- Back in the SQL Server Configuration Manger, just change the port to whatever you are going to use. Also be sure to change these ports on both the Windows firewall and in your VPC’s security group for the subnet in which the EC2 instance is running:
Once you change your listening port, there are some consequences to consider. First, users who access this SQL Server instance over the internet will need to use connect strings (for clients like SSMS) and/or explicitly specify the port in URLs. SQL Server connect strings use a comma. Browsers use a colon. This can be quite confusing. Here’s an example of how to specify a connect string in SSMS to connect to our internet-exposed SQL Server:
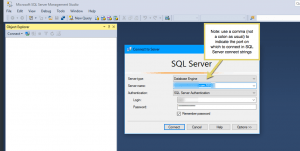
And this is a sample SQL Server connect string specifying an alternative port: Provider=SQLOLEDB.1;Password=[yourpassword]Persist Security Info=True;User ID=[youruserid];Initial Catalog=master;Data Source=internet-exposed.sqlserver.com,11111
In a browser, of course, you’d connect using a colon, as so: https://internet-exposed.sql-server.com,11111
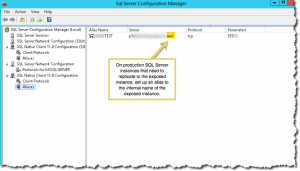
I don’t run the SQL Server browser service — maybe it’s just the way we’ve configured things, but I find it useless. So, the question becomes how can your production SQL Server instances find the internet-exposed instance on a non-standard port for replication, etc? Answer: use SQL Server aliases, a DNS-like capability. An alias can specify both the destination name and the port, meaning that you don’t have to mess around with connect strings at all on the connecting server. As you can see in this screenshot, I set up an alias on a production DBMS to point to the internal address of the internet-exposed instance and specified the port on which the production server should connect to it:
One final point regarding SQL Server Reporting services: it can use the same certificate as the database engine. But it needs its own listening port. This port will also need to be opened in the Windows firewall and also in the VPC security group for the subnet.
A note to DevOps: I am sure this can be automated in either or both of PowerShell DSC and/or Chef. But before you try it in code, I would recommend trying the setup manually. There are plenty of steps and details I didn’t mention here that might present some challenges in code.
Good luck! If you have any questions or feedback, please post them as a comment to this post.
March, 2017 update: Using TLS (SSL) certs with SQL Server Reporting Services
You can use the certificates installed as described above with SQL Server services like SQL Server Reporting Services (SSRS). However, as I discovered, it’s not easy to update the certificate in SSRS when they expire. This is especially true if you use non-standard TLS (SSL) ports.
As you can see here, SSRS allows you to “bind” a certificate to a specific port over which users and applications can securely access SSRS.
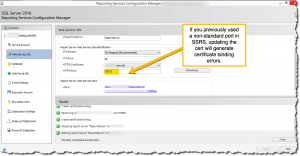
If you change the certificate when it expires and attempt to use it in the dialog above, you will receive a “certificate binding error” from SSRS. This is because SSRS does not delete the previous binding — a bug Microsoft has apparently never fixed, since you can find people discussing it as far back as six years ago.
It’s easy to fix using netsh. Just enter netsh, then delete http sslcert ipport=0.0.0.0:yourportnumber forIPv4 bindings or delete http sslcert=[::]:yourportnumber for IPv6 bindings. Here’s a screenshot with an example.
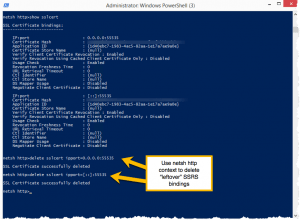
Then, you can rerun the SSRS dialog to assign the renewed certificate to the SSRS port you wish to use.

Leave a Reply